
This deviled eggs recipe is arguably the most requested party appetizer in history, transforming humble hard-boiled eggs into elegant, bite-sized masterpieces. At dishy.blog, we have rigorously tested the “Julia Child method”—swapping excess mayo for creamy butter—to ensure you achieve a velvety, savory filling that stands upright and melts in your mouth. Whether it is for a holiday spread, a summer BBQ, or a quick protein-packed snack, this foolproof guide guarantees perfectly centered yolks and flavor perfection every single time.
🛠️ Don’t Let Your Tools Ruin Your Eggs
The Spider Strainer
Dropping eggs into boiling water with a spoon often leads to cracks. A stainless steel spider allows you to lower multiple eggs gently and safely.
The Mini Food Processor
To get that bakery-style, lump-free filling, a fork won’t cut it. This tool blitzes the yolks and butter into an ultra-smooth emulsion in seconds.
Jump to Recipe:
Planning a Party Spread?
Deviled eggs are just the beginning. If you are looking for more crowd-pleasing finger foods that can be prepped in advance, explore our collection of appetizers. From crispy sliders to savory dips, every recipe is tested to perfection to ensure your hosting duties are stress-free and delicious.
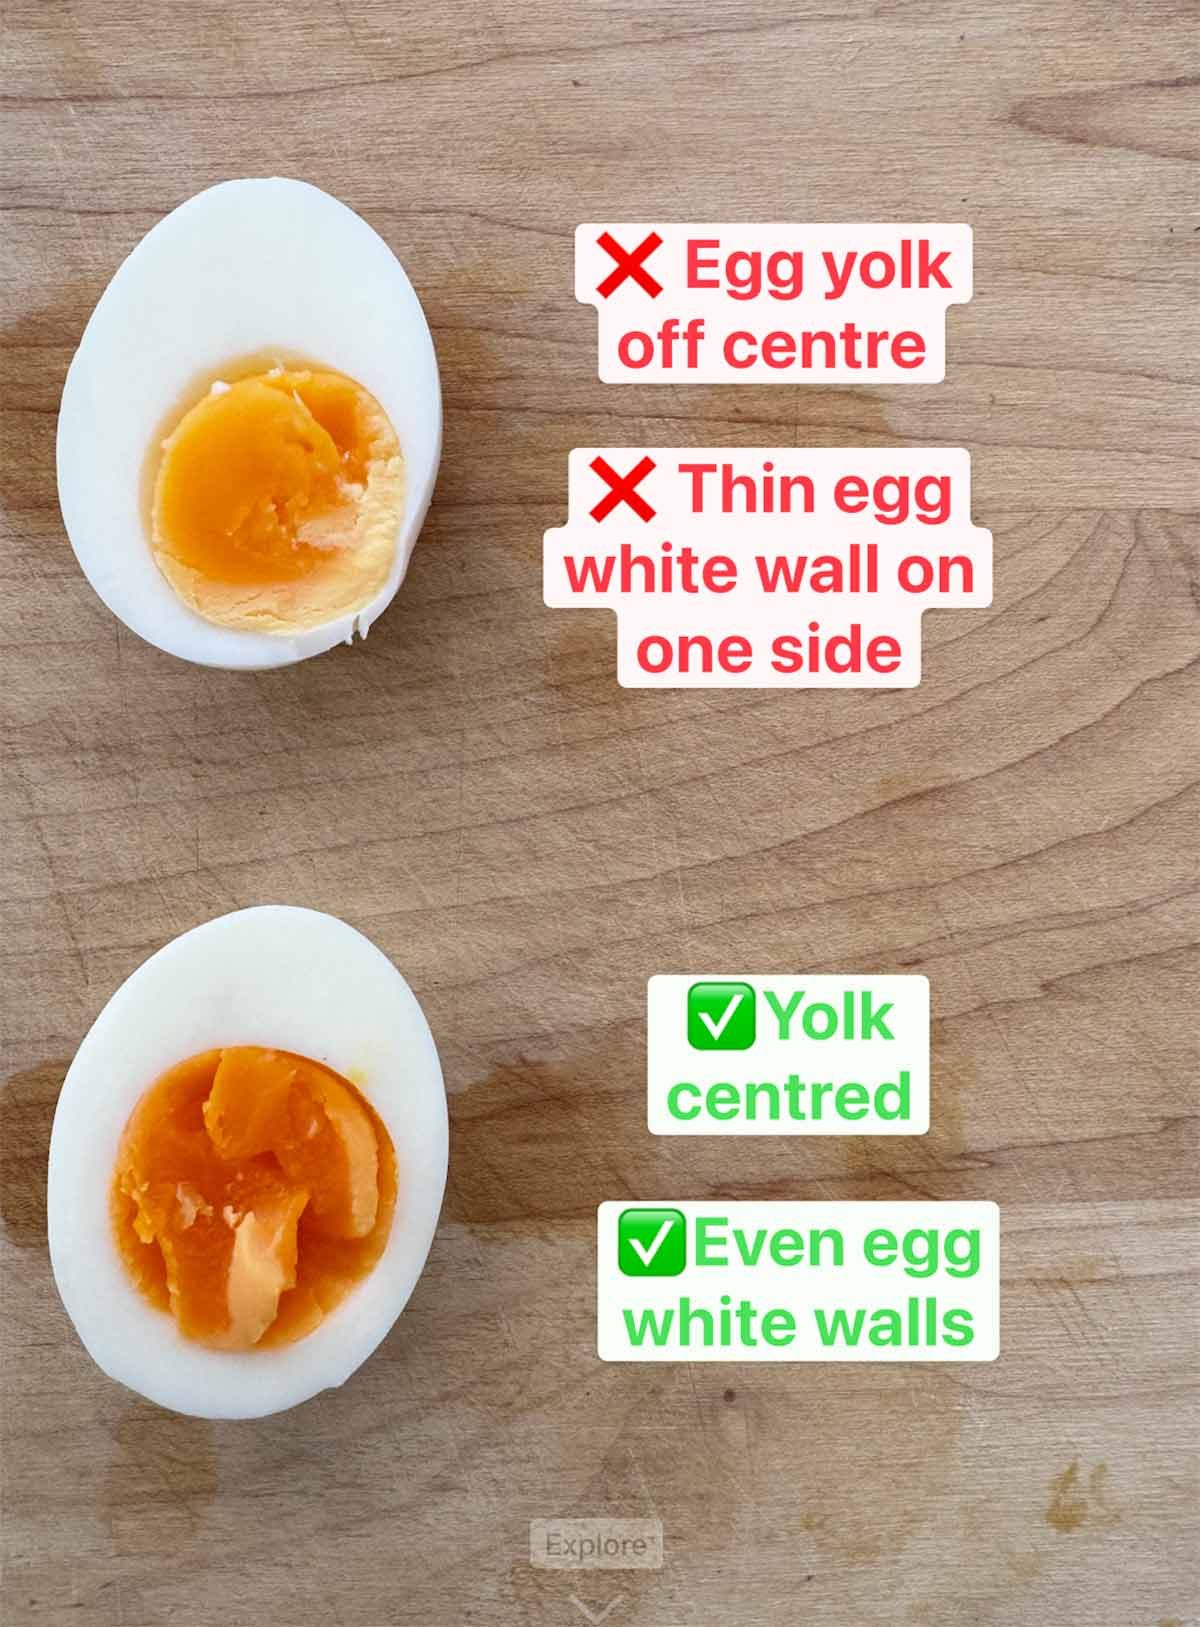
1. The Secret to Perfectly Centered Yolks
Before we even discuss the filling, we must address the foundation: the hard-boiled egg. Nothing ruins the aesthetic of a deviled egg faster than an off-center yolk that leaves a paper-thin wall of egg white, prone to tearing. Through extensive testing in the dishy.blog kitchen, we have confirmed that the “Boil and Swirl” technique is the most reliable way to keep those yolks perfectly positioned. By using centrifugal force during the initial cooking phase, the yolk is suspended in the center of the albumen as it sets.
The Base Ingredients
- • Large Eggs: 12 (50-55g / 2 oz each), fridge cold
- • Water: Enough to cover eggs by 1 inch
- • Ice: For the water bath
Boiling Instructions
The Boiling Setup
Bring a Large Stock Pot filled with approximately 6 inches of water to a rolling boil. It is crucial to use a pot large enough so the eggs are not crowded; they need room to move. Once boiling, lower the heat slightly to a simmer to prevent violent bubbling which can crack the shells. Using a spider strainer or slotted spoon, gently lower the 12 cold eggs into the water one by one. Do not drop them!
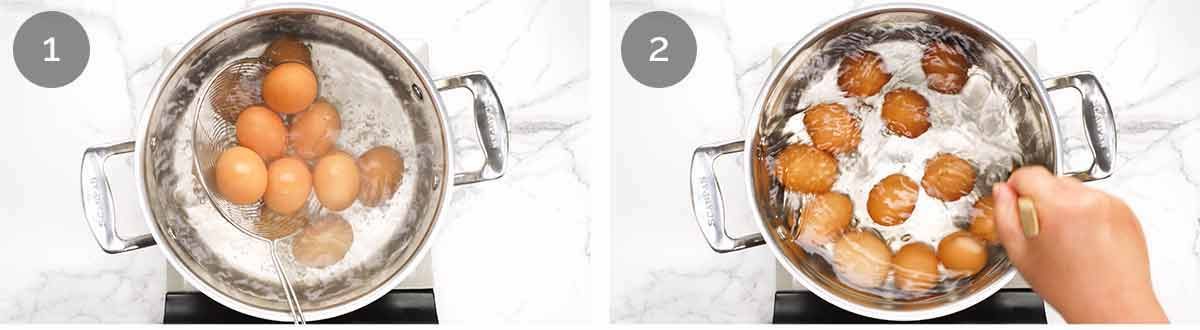
The Centrifugal Swirl
This is the most critical step for aesthetics. Set your Digital Kitchen Timer for exactly 10 minutes. For the first 6 minutes of cooking, use the handle of a wooden spoon to swirl the water in a circular motion. Give the water 4 or 5 fast stirs in one direction every minute. This creates a gentle vortex that spins the eggs, forcing the yolk to stay in the center while the white solidifies. You do not need to do this for the final 4 minutes.
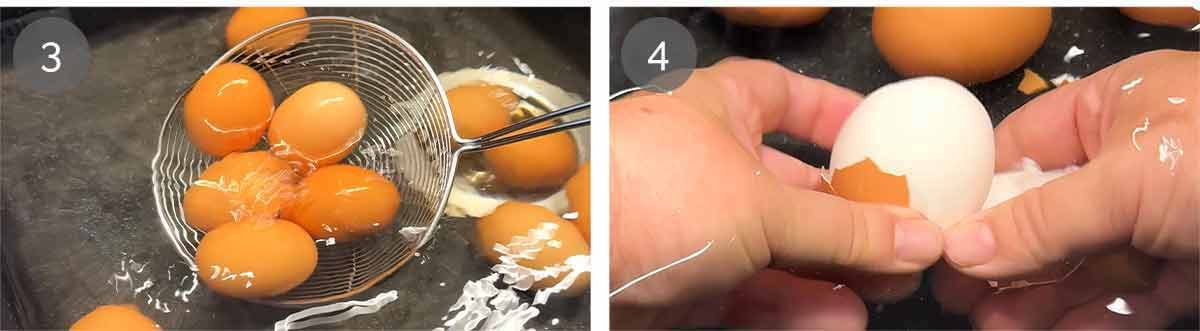
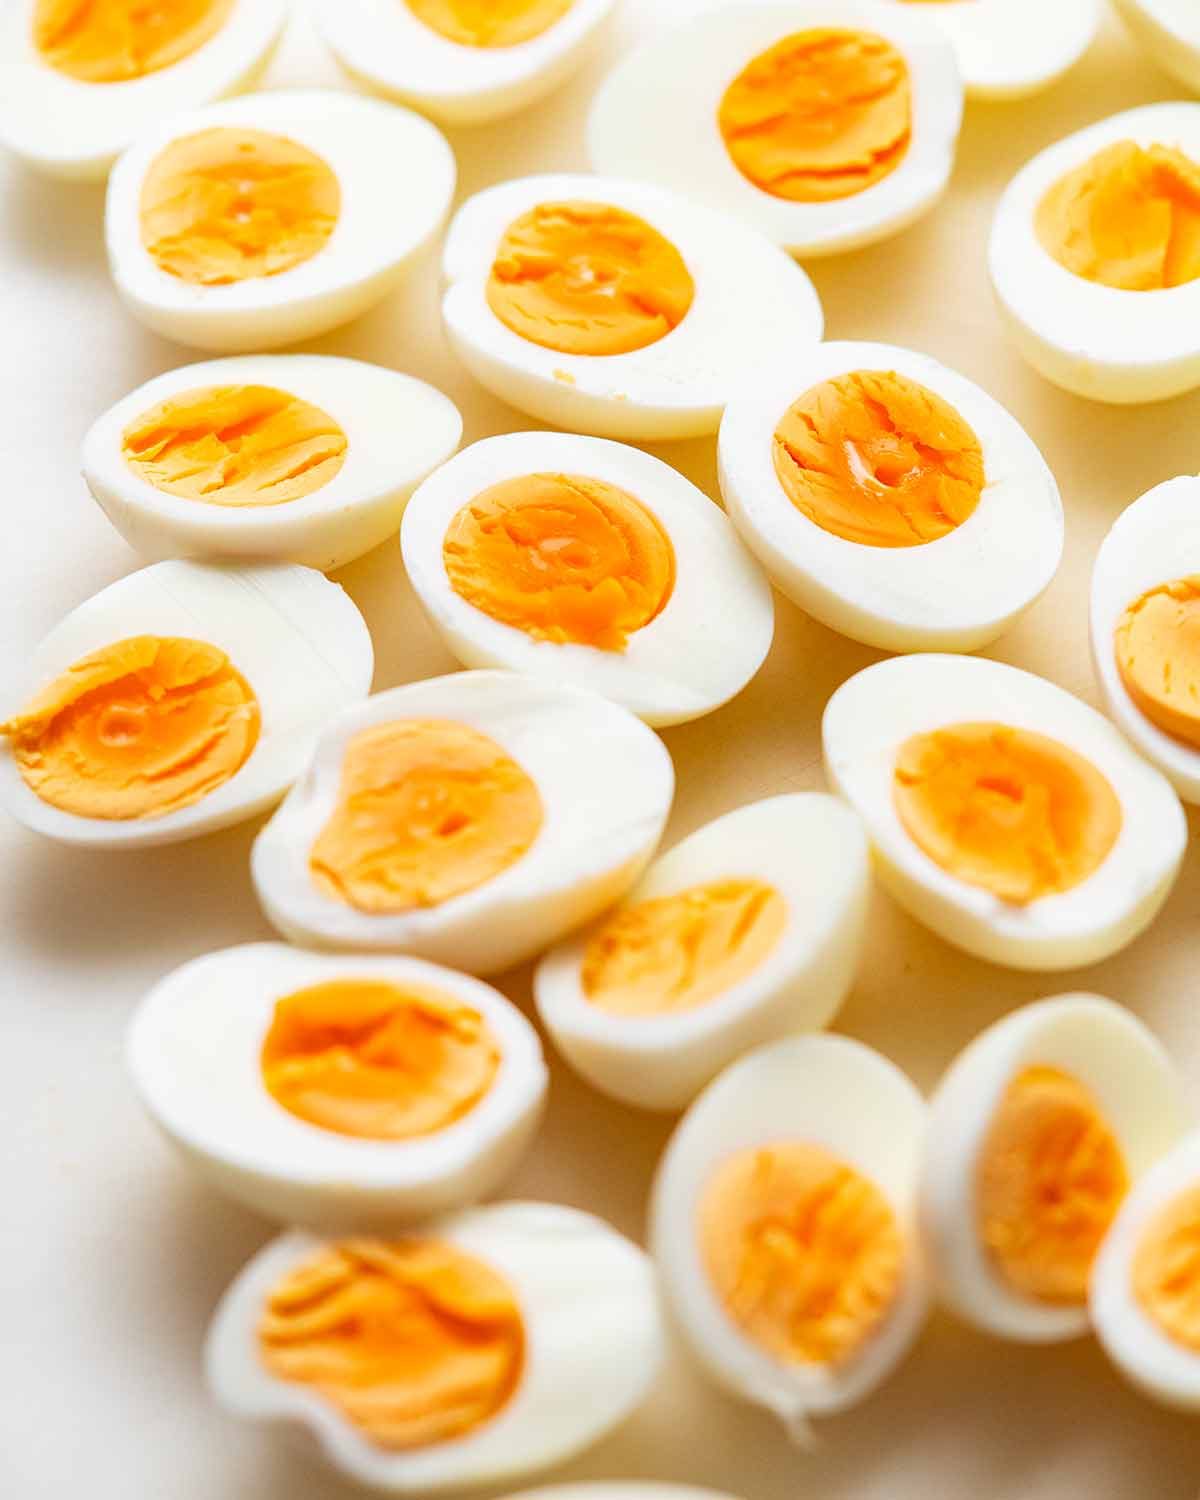
Shock and Peel
While the eggs are finishing their boil, prepare a large bowl filled with cold water and ice. As soon as the timer beeps, remove the eggs and plunge them immediately into this ice bath. Leave them for at least 5 minutes until they are completely cool to the touch. To peel, tap the base of the egg (the wider end where the air pocket is) on the counter to crack it, then peel under running water or submerged in the bowl. The water helps slip the shell off cleanly, leaving a smooth surface.
Need a Main Course?
Deviled eggs are the perfect starter, but what about the main event? Our “Family Approved” dinner collection features hearty mains that pair perfectly with light appetizers. From roast chicken to classic meatloaf, find your next favorite meal here.
2. The “Julia Child” Butter Filling Method
Most standard recipes rely heavily on mayonnaise, which can sometimes result in a greasy mouthfeel or a filling that “weeps” after an hour. Inspired by the legendary Julia Child, this dishy.blog recipe replaces a significant portion of the mayonnaise with unsalted butter. The result? A filling that mimics the texture of a savory buttercream frosting—stable, incredibly smooth, and rich without being oily. Combined with the tang of Dijon and Tabasco, it is a flavor profile that feels sophisticated yet comforting.
Filling Ingredients
- • Egg Yolks: From the 12 boiled eggs
- • Unsalted Butter: 50g (3 tbsp), cold, cut into small cubes
- • Mayonnaise: 2 tsp (Whole egg or Kewpie preferred)
- • Dijon Mustard: 2 tsp
- • Tabasco Sauce: 2 tsp (Adjust to taste)
- • White Wine Vinegar: 1 tsp
- • Salt: 1/4 tsp (Cooking/Kosher salt)
- • Garnish: Paprika (Sweet or Smoked) & 1 tbsp finely chopped Chives
Assembly Instructions
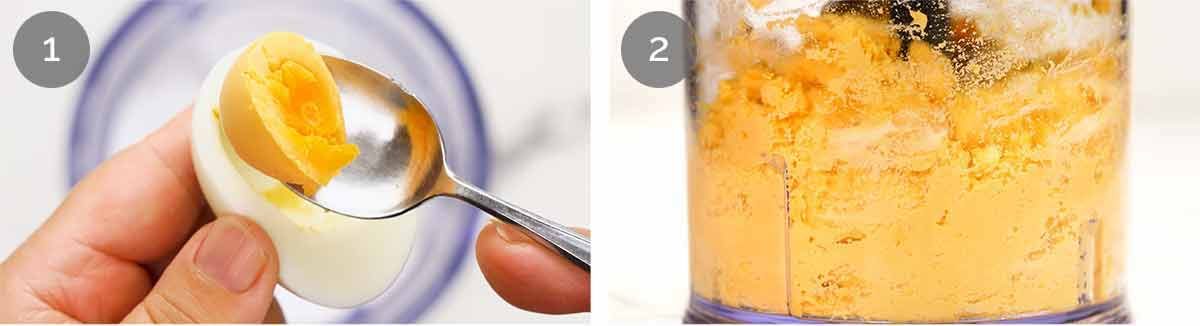
Processing the Yolks
Slice the cooled eggs in half lengthwise. Gently pop the yolks out into the bowl of a small food processor using a teaspoon. You should have about 18-20 perfect egg white halves (reserve the less perfect ones for a salad). Add the Dijon mustard, Tabasco, white wine vinegar, mayonnaise, and salt to the yolks. Do not add the butter yet. Blitz this mixture until the yolks are completely broken down and the mixture looks sandy or paste-like. Scraping down the sides with a Silicone Spatula ensures no lumps are left behind.
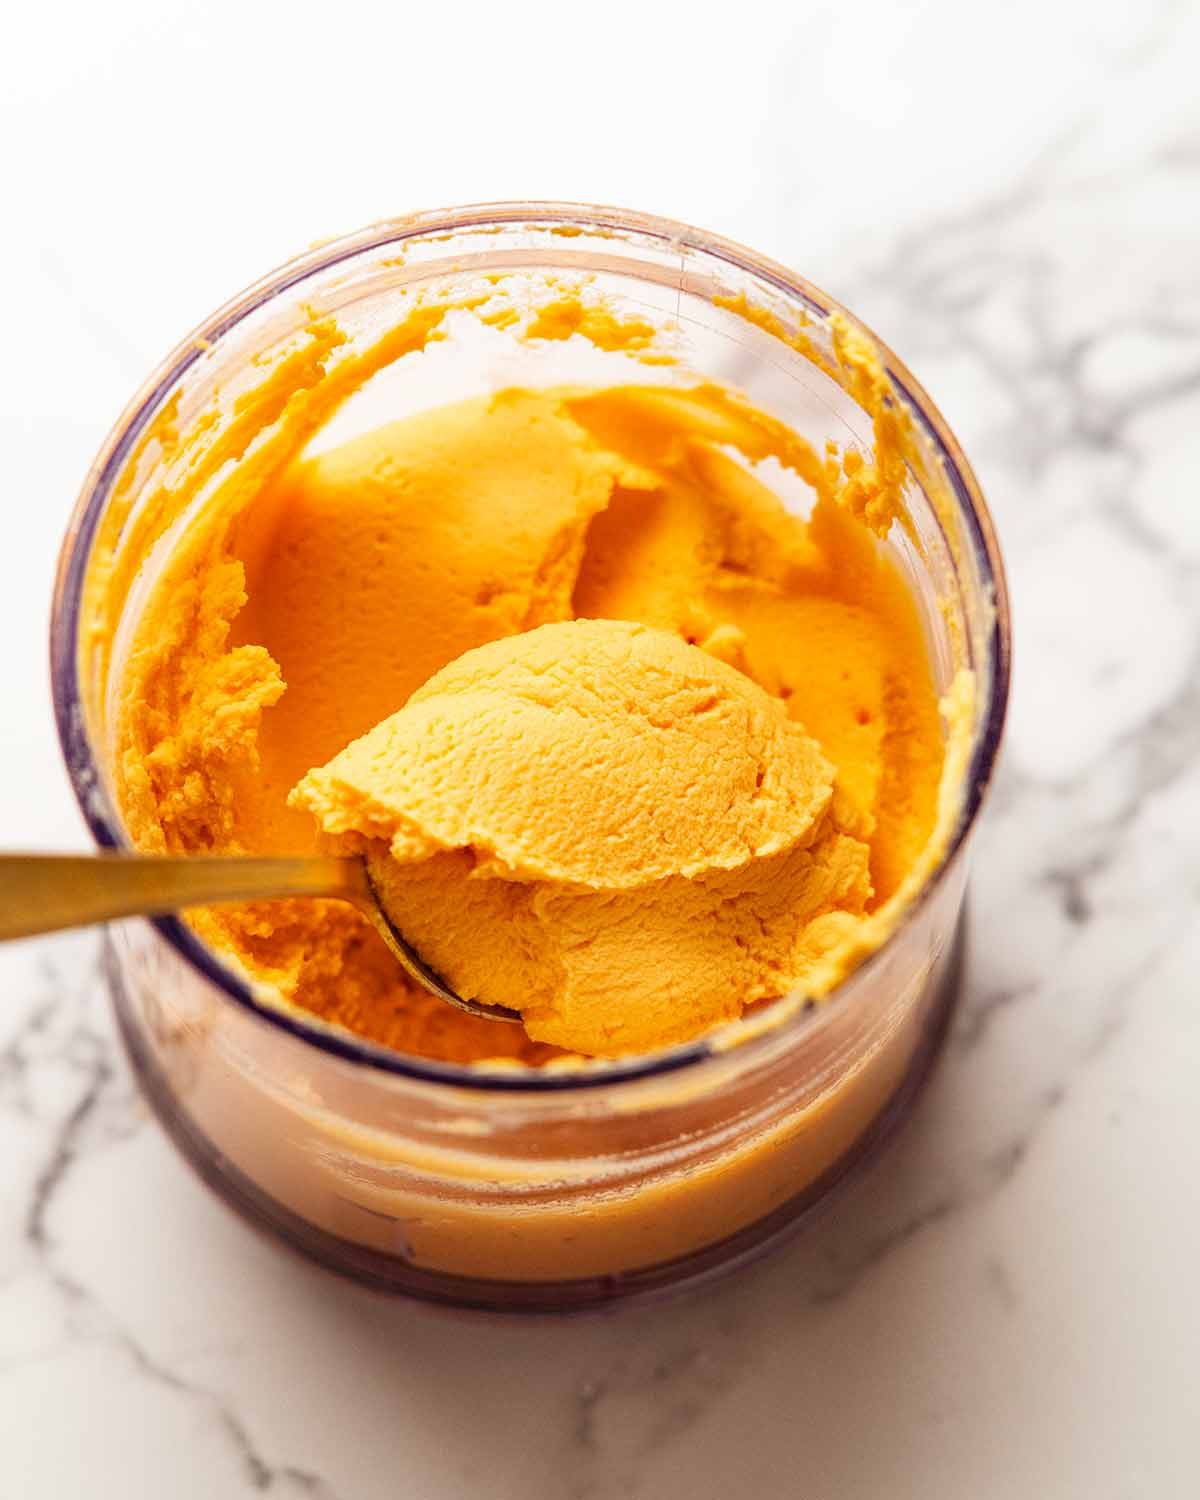
Emulsifying the Butter
Add the cold butter cubes to the processor. Blitz again on high speed. Watch as the mixture transforms from a dry paste into a pale, silky, and voluminous cream. Check the consistency by smearing a little bit on the back of a spoon; it should be completely smooth with absolutely no graininess. If you do not have a food processor, you must use softened butter and mash vigorously with a fork, then push the mixture through a fine-mesh sieve for the best texture.
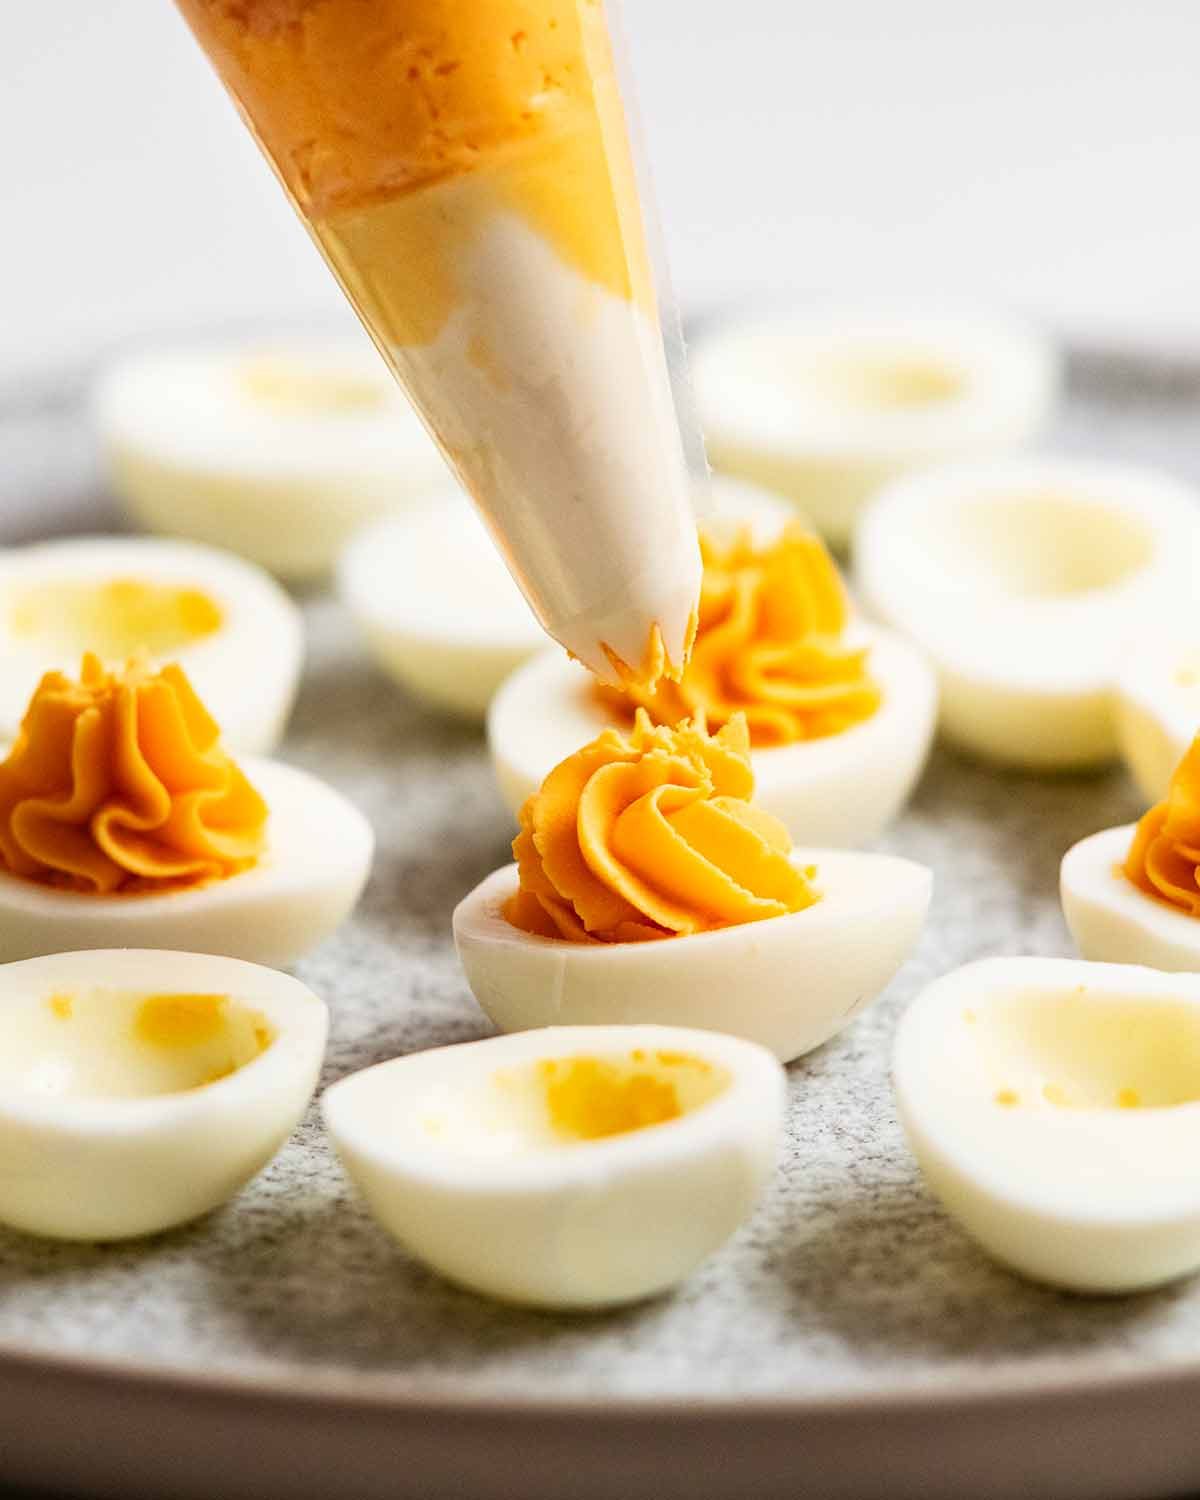
Professional Piping
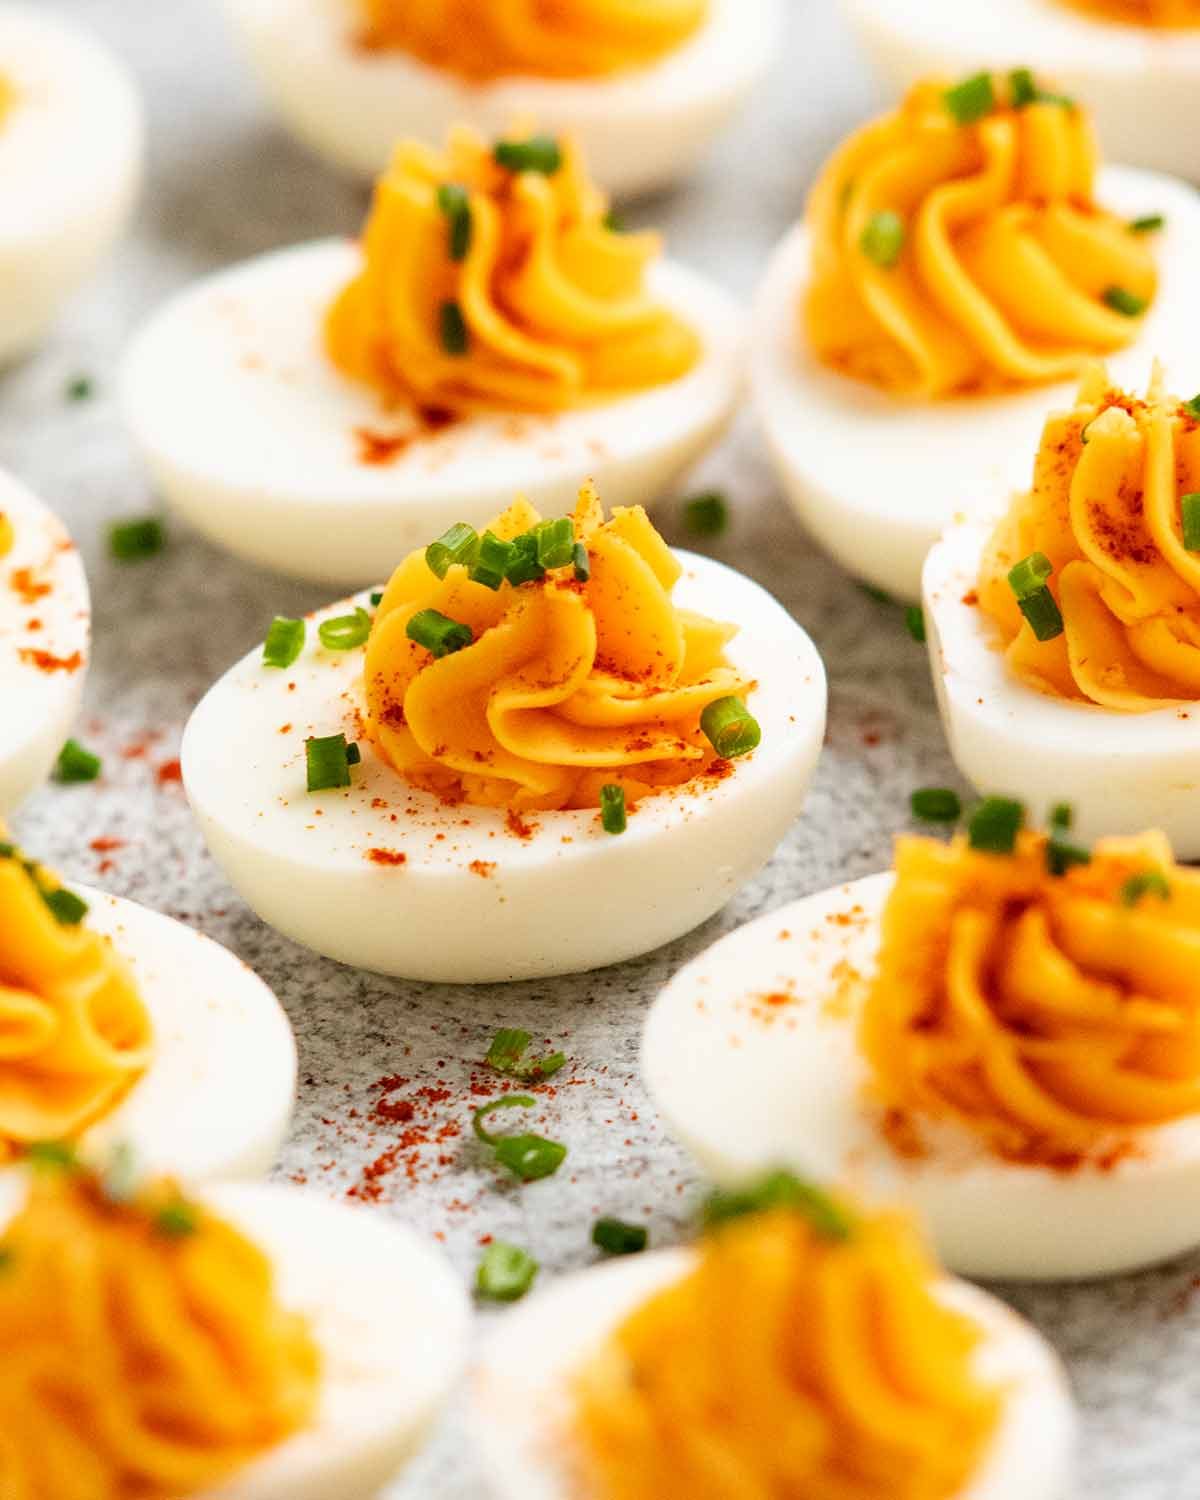
Transfer the creamy filling into a Piping Bag fitted with a large star tip (like a Wilton 1M or 2D). Pipe the filling generously into the cavity of each egg white half. Using a swirling motion creates height and an elegant appearance. You should have enough filling to mound each egg generously, approximately the volume of a whole yolk per half.
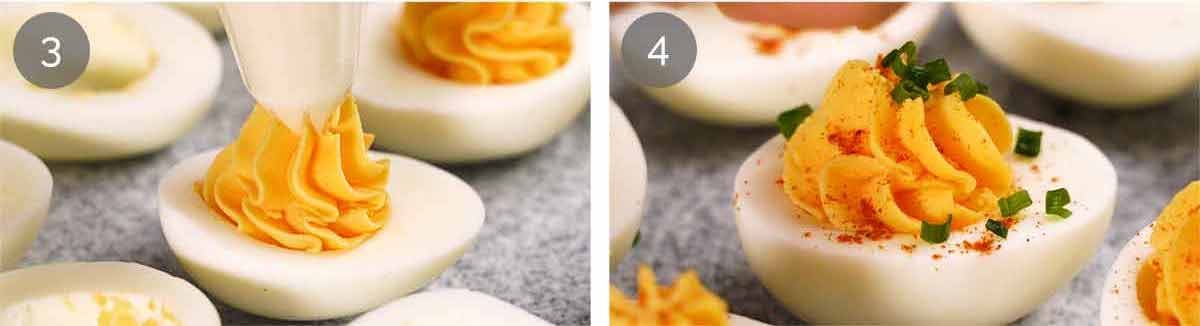
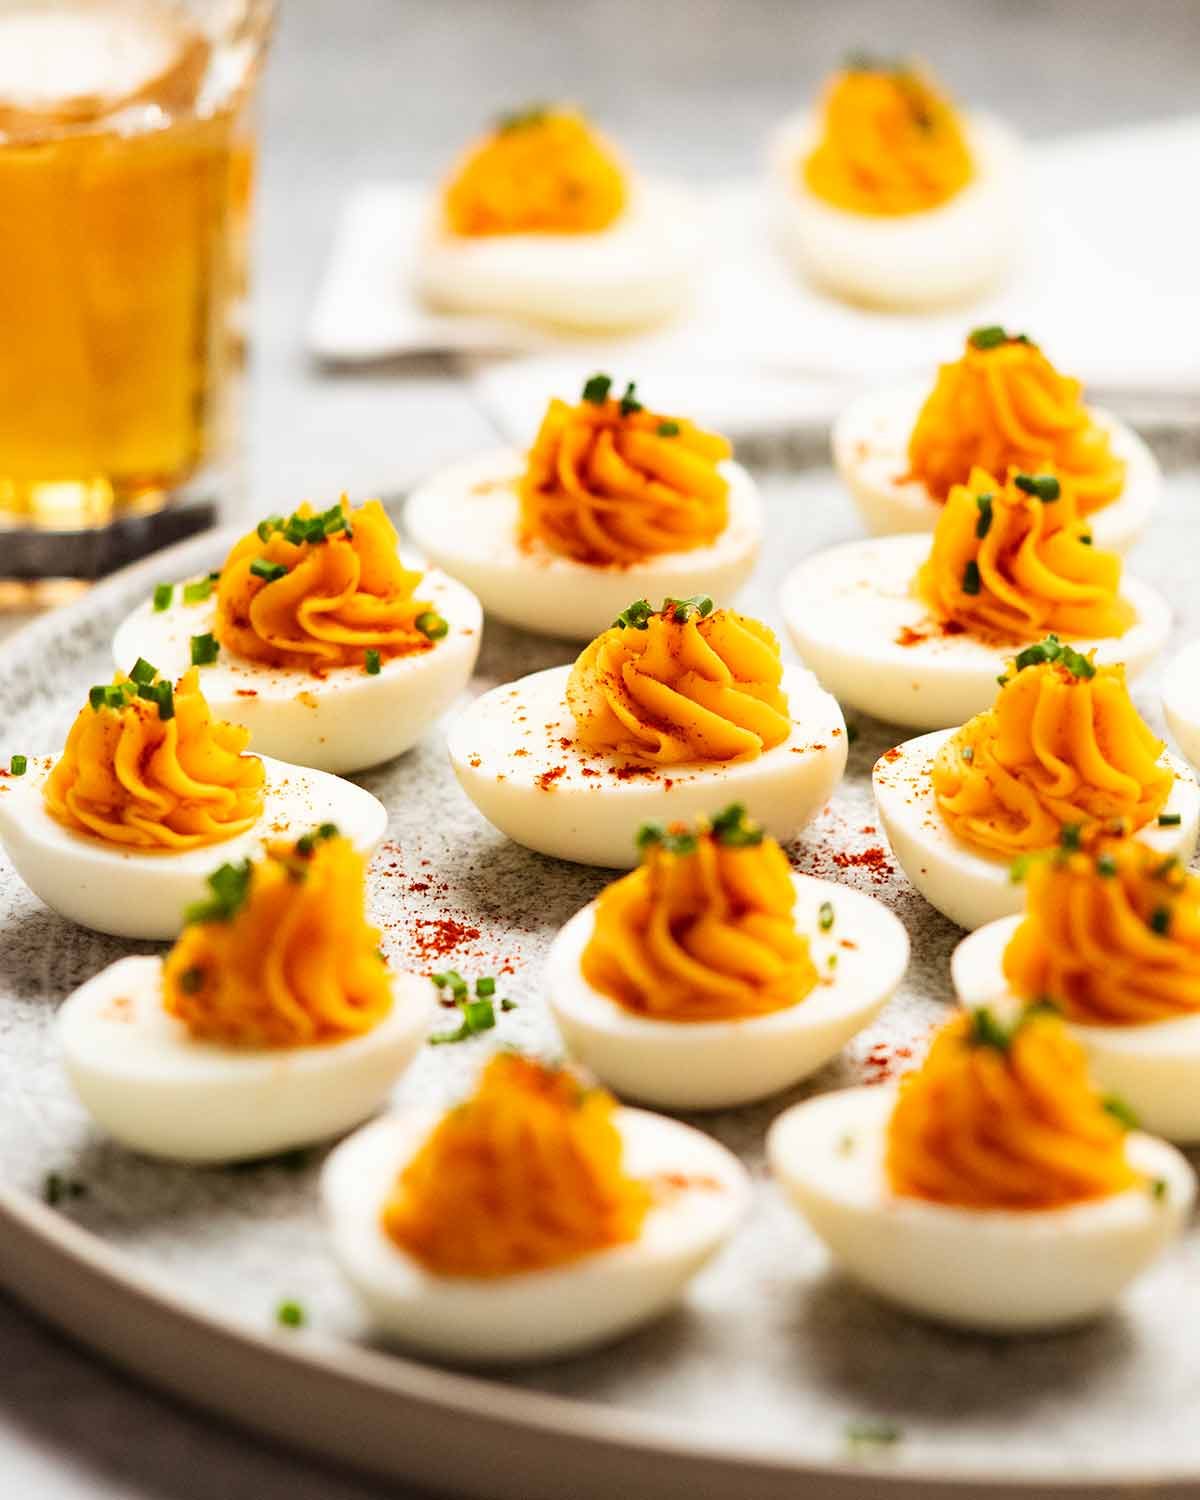
The Final Garnish
To finish, lightly dust the eggs with Smoked Paprika for a pop of color and a hint of smoky flavor. Sprinkle with the finely chopped fresh chives. Serve these immediately, or store them in the fridge. However, for the absolute best flavor and texture, remove them from the refrigerator 20 minutes before serving to let the butter in the filling soften slightly, returning it to its ultimate creamy state.
🧪 The Science: Butter vs. Oil vs. Mayo
Why do we use butter in this recipe when traditional versions use mayonnaise? At dishy.blog, we believe understanding your ingredients leads to better cooking. Mayonnaise is essentially an emulsion of oil and egg yolk. While delicious, it is liquid at room temperature. By using butter, which is solid at room temperature (and even firmer when chilled), we introduce a different fat structure.
- Structural Integrity: The saturated fats in butter help the piped filling hold its shape much better than oil-based fillings, which can slump over time.
- Mouthfeel: Butter melts at body temperature. When you eat a butter-based deviled egg, the filling literally melts on your tongue, providing a luxurious, premium mouthfeel that oil simply cannot replicate. It creates a cleaner finish on the palate compared to the sometimes greasy coating left by excess mayonnaise.
📝 Essential Host’s Tips & FAQ
Transporting Deviled Eggs
One of the biggest challenges with deviled eggs is getting them to the party without them sliding around and ruining your beautiful piping. If you plan to travel, we highly recommend investing in a dedicated Deviled Egg Carrier with custom divots. Alternatively, you can slice a very thin sliver off the bottom of each egg white half to create a flat surface, ensuring they sit flat on your serving platter.
Make-Ahead Strategy
- Storage: Fully assembled deviled eggs can be stored in the refrigerator for up to 2 days. However, wait to add the paprika and chives until just before serving to keep the garnish looking fresh.
- Leftover Filling? If you have extra filling (unlikely!), it makes a fantastic spread for toast or a rich addition to a potato salad.

Meet Jack Reynolds, the face, the stomach, and the passionate home cook behind dishy.blog. If you are looking for a Michelin-starred chef with decades of formal culinary training and a fancy restaurant background, you are definitely in the wrong place! Jack is not a professionally trained chef; he is just a regular guy who happens to have a massive, undeniable obsession with good, hearty food and feeding the people he loves.
Born and raised in the heart of Texas, Jack grew up watching his mother and grandmother turn basic pantry staples into absolute magic. However, as he grew older and started working a demanding 9-to-5 corporate job, he realized that most recipe blogs online were either incredibly complicated, required expensive and hard-to-find ingredients, or took hours to prepare. Frustrated by the lack of realistic weeknight meals for busy families, Jack decided to roll up his sleeves, tie on a flour-dusted apron, and start experimenting in his own kitchen.
He began modifying classic Southern comfort foods and traditional American dinner favorites to make them quick, easy, and incredibly pantry-friendly. What started as a small digital diary to keep track of his kitchen triumphs (and a few burnt failures) eventually blossomed into dishy.blog.
Jack’s culinary philosophy is incredibly simple: cooking at home should never be intimidating, complicated, or boring. He truly believes that the fondest memories are made when gathered around a table with a wildly delicious, home-cooked meal. Whether he is perfecting a 20-minute One-Pan Garlic Butter Steak, cracking the code to the crispiest buttermilk fried chicken, or baking a batch of his famous “melt-in-your-mouth” triple-fudge brownies, Jack’s mission is to provide foolproof recipes that anyone can master. Every single recipe on dishy.blog is rigorously tested and family-approved to guarantee flawless results.
When he isn’t busy creating mouth-watering dishes or tweaking his ultimate baked mac and cheese recipe, Jack loves hosting weekend backyard BBQs, exploring local Texas farmers’ markets, and spending time with his wife and two kids—who happily serve as his primary, and toughest, taste testers.