This chicken breast recipe is the ultimate answer to the weeknight dinner dilemma, delivering juicy, restaurant-quality results in just 12 minutes. At dishy.blog, we have rigorously tested this pan-searing method to prove that pantry staples can transform humble poultry into a “melt in your mouth” masterpiece without hours of marinating.
🛠️ Don’t Let Your Tools Ruin Your Dinner
The Perfect Sear Skillet
Achieving a golden crust without sticking requires a reliable surface. This hard-anodized nonstick skillet ensures even heat distribution for that professional finish.
The Juiciness Savior
Stop guessing if your chicken is done. Overcooking by even a minute dries out the meat. This instant-read thermometer is the secret to guaranteed moisture.
Jump to Section:
Need Dinner on the Table Fast?
If you love recipes that don’t require hours of prep, you need to explore our “30-Minute Meals” collection. From stir-fries to quick pastas, we have curated the best family-approved recipes for busy weeknights.
1. The Dishy.blog Go-To Chicken Method
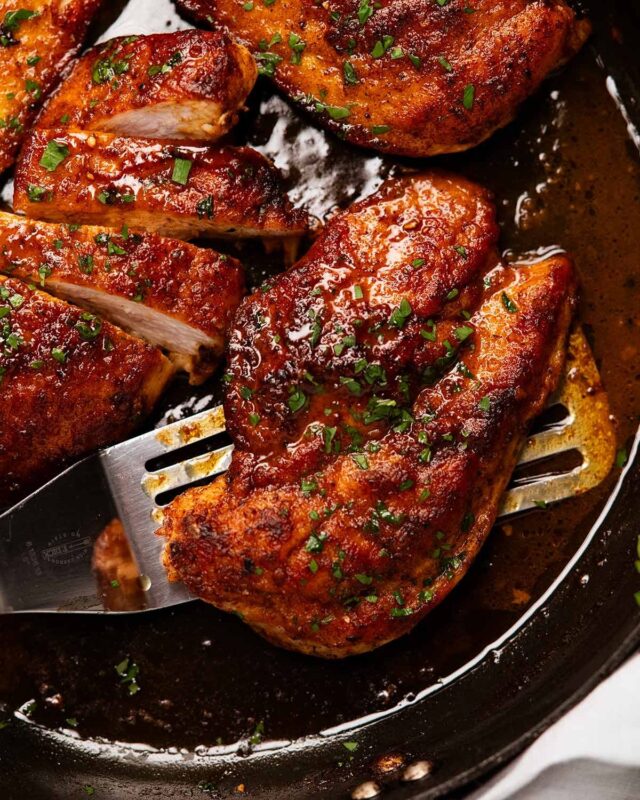
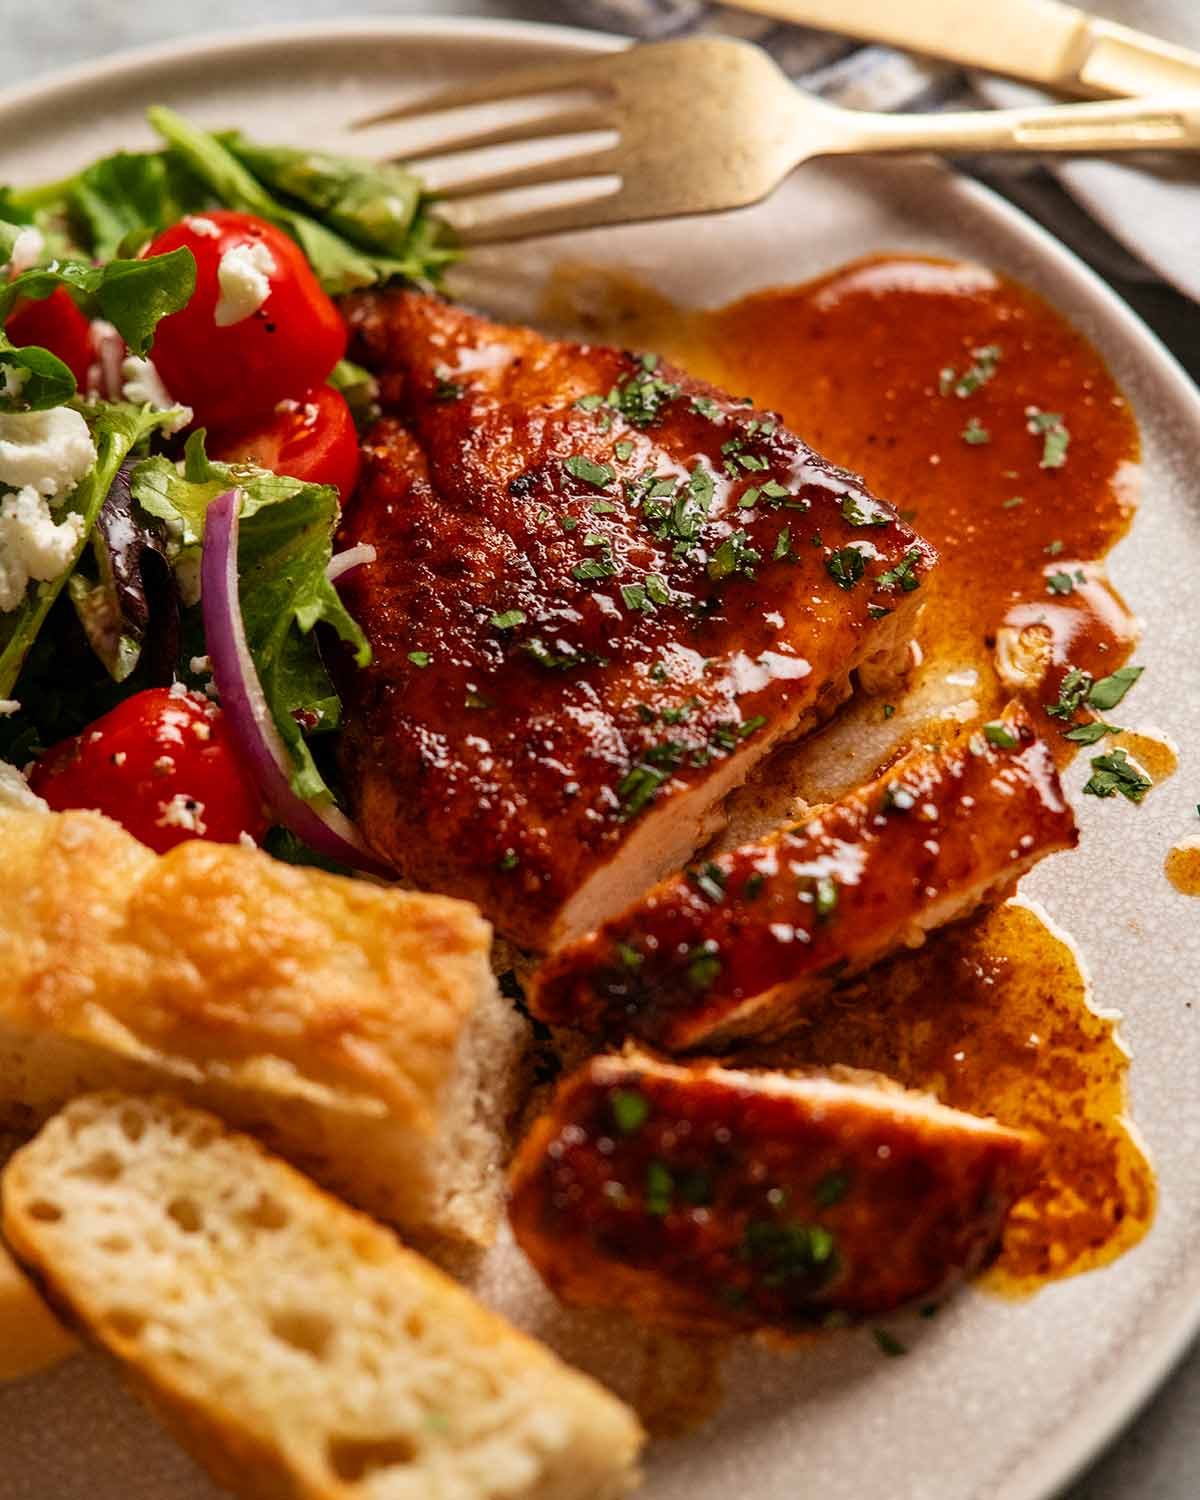
This is not just another bland poultry dish; it is a meticulously balanced technique combining a savory, country-style seasoning crust with a luxurious, rapid-simmered butter sauce. The method relies on high-heat searing to lock in flavor, followed by a deglazing process that utilizes the “fond” (browned bits) left in the pan. By dusting the meat in seasoned flour rather than a heavy breading, we create a delicate texture that absorbs the white wine reduction perfectly. This recipe solves the common problem of rubbery, dry meat by utilizing a specific cutting technique and precise cooking times, ensuring a tender bite that our readers at dishy.blog consistently rate as a family favorite.

2. Ingredients & Pantry Substitutions
Great cooking doesn’t require a trip to a specialty grocery store; it requires understanding how simple pantry staples interact to create complex flavors. This recipe uses a strategic blend of spices to create a savory profile that mimics slow-cooked depth in a fraction of the time. Below, we break down the purpose of each component and offer viable substitutions for the modern home cook.
For the Country Seasoned Chicken
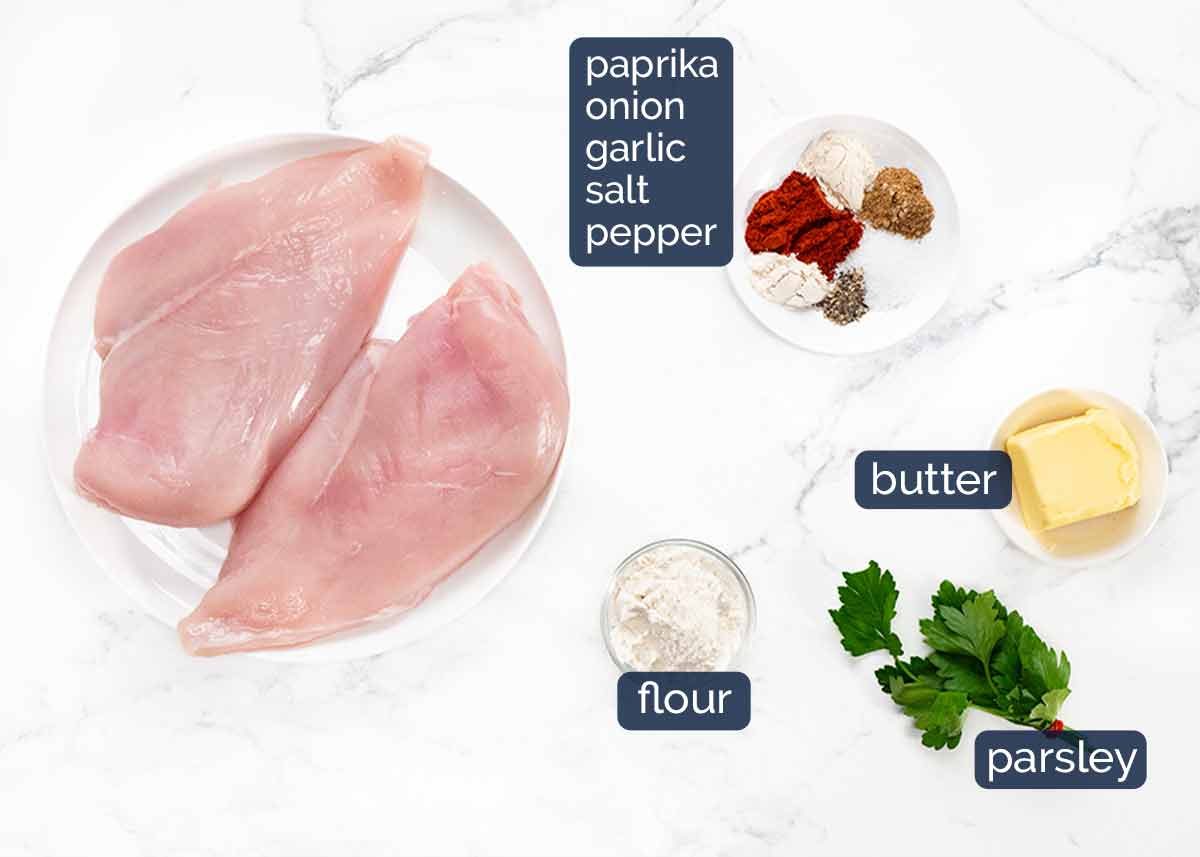
- Chicken Breast: 2 large breasts (approx. 250-300g / 8-10 oz each). We will cut these horizontally to create 4 even steaks.
- Unsalted Butter: 20g (1.5 tbsp) for searing. Using butter adds nutty solids that brown and flavor the sauce later.
- Paprika: 1 tsp. Sweet or regular paprika provides the base color and mild earthiness.
- Onion & Garlic Powder: 1/2 tsp each. These aromatics provide savoriness without the risk of burning that fresh garlic might have at high heat.
- Cumin: 1/4 tsp. A background note of warmth. Can be swapped for dried thyme or coriander.
- Salt & Black Pepper: 3/4 tsp salt and 1/8 tsp pepper. Essential for flavor activation.
- All-Purpose Flour: 1.5 tbsp. This is crucial for creating the crust and slightly thickening the pan sauce.
For the White Wine Butter Sauce
- Dry White Wine: 1/3 cup. Chardonnay is our top pick for its body, but Pinot Grigio or Sauvignon Blanc work well. Alcohol-free? Use low-sodium chicken broth.
- Unsalted Butter: 30g (2 tbsp). Cold butter mounted into the sauce creates a glossy, velvety emulsion.
- Parsley: 1 tbsp, chopped. Adds a fresh, herbaceous finish to cut the richness.
Love Comfort Food?
Nothing beats the warmth of classic home cooking. If this recipe speaks to you, you will adore our “Classic American Comfort Food” collection. From mac and cheese to meatloaf, we’ve updated the classics to be more reliable and flavorful than ever.
3. Step-by-Step Cooking Instructions
Follow these precise steps to ensure your chicken remains juicy and the sauce emulsifies correctly. The entire active cooking process is very fast, so we recommend having all your ingredients measured and ready (mise en place) before you turn on the heat. This “chef’s readiness” prevents burning and stress during the searing process.
Prepare the Chicken Steaks
Place your chicken breasts on a stable cutting board. Place your palm flat on top of a breast and carefully slice through it horizontally to create two even, thin steaks (cutlets). Repeat with the second breast so you have 4 pieces total. Unlike other recipes, there is no need to pound the meat; cutting them provides the perfect thickness for rapid, even cooking. A sharp High-Carbon Chef’s Knife makes this horizontal cut safer and cleaner.

Season and Coat
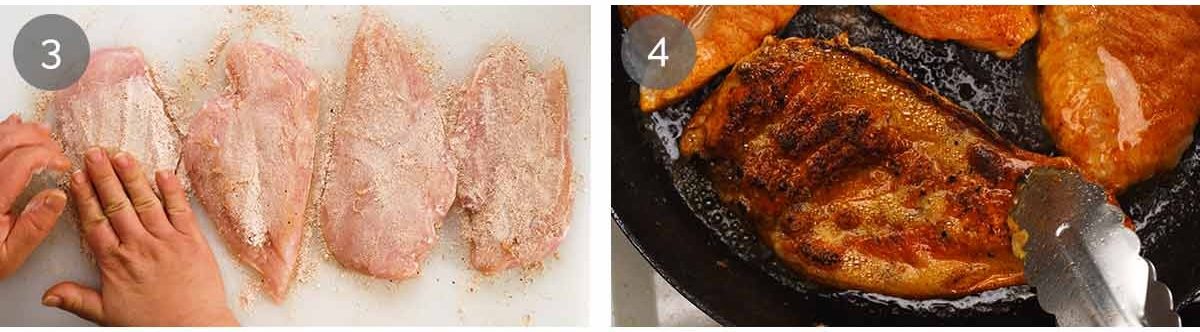
In a small bowl, combine the flour, paprika, onion powder, garlic powder, cumin, salt, and pepper. Mix thoroughly to ensure the spices are evenly distributed within the flour. Sprinkle this seasoning mixture over both sides of the chicken cutlets. Use your fingers to rub and spread the powder across the surface, ensuring every inch is coated. Shake off any excess loose flour; we want a thin coating, not a heavy batter.
The High-Heat Sear
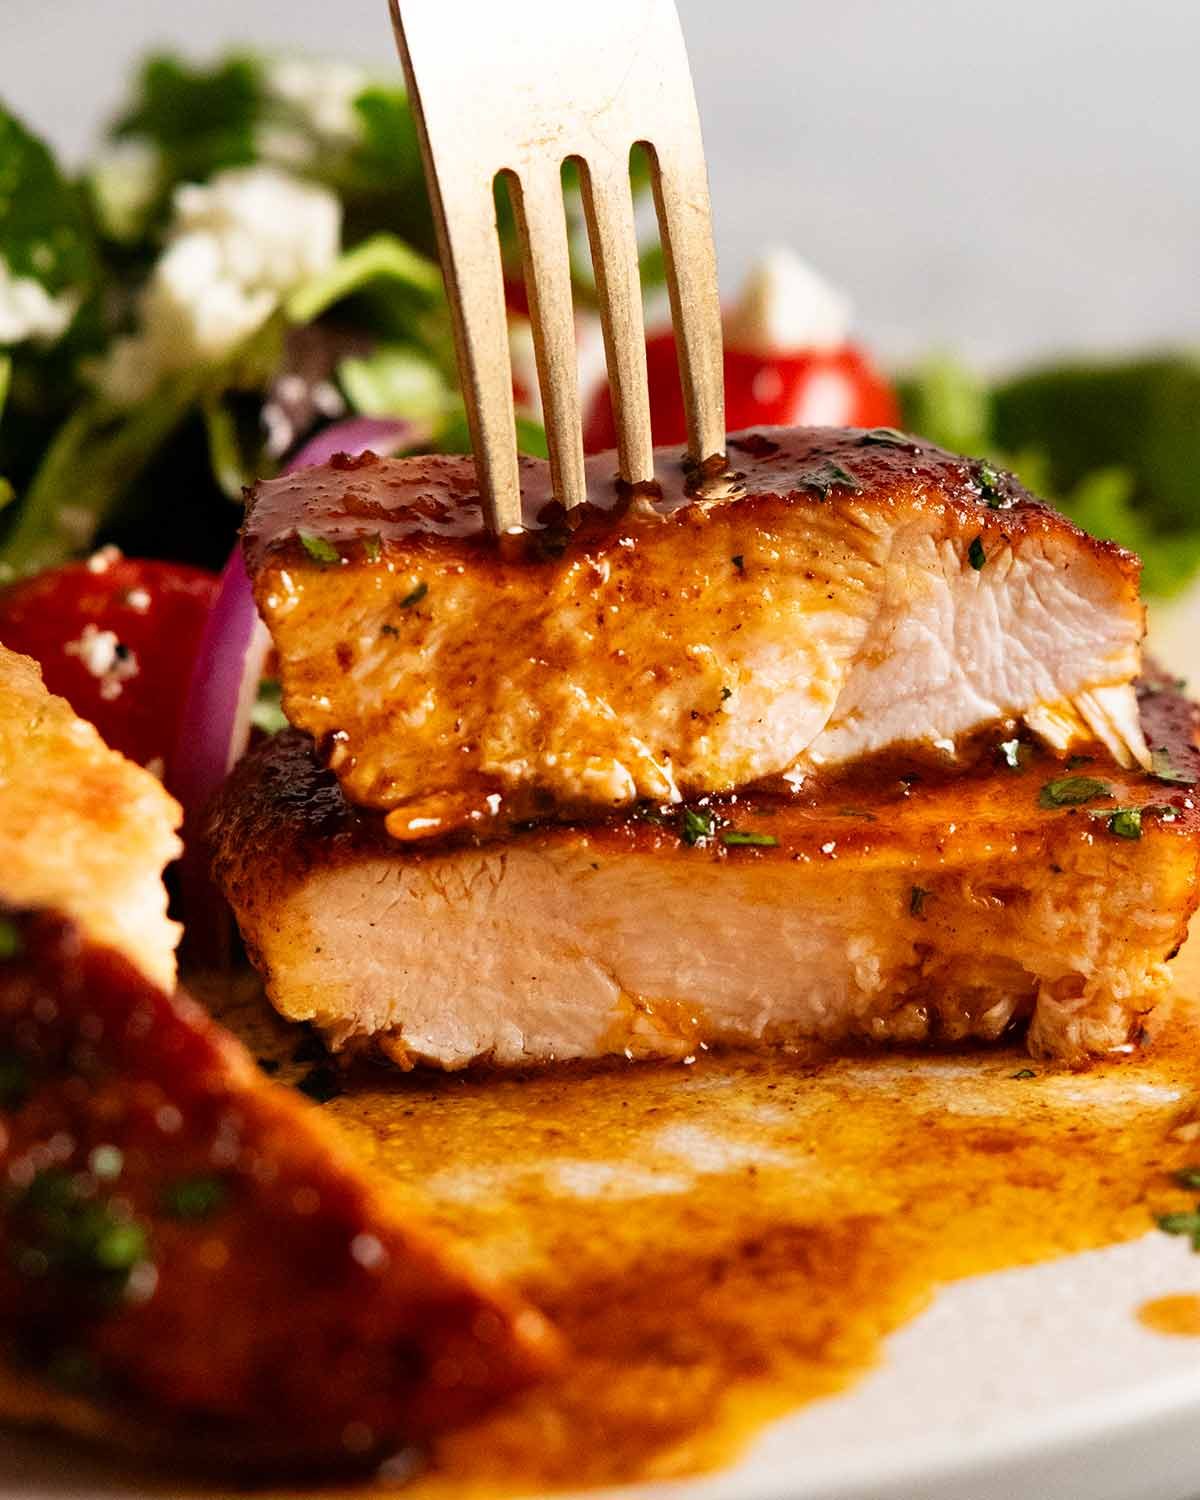
Melt the first 20g (1.5 tbsp) of butter (or olive oil) in a large non-stick pan over high heat. Wait until the butter foams and then subsides slightly—this indicates the pan is hot enough. Place the chicken in the pan. It is okay if they are snug, as they will shrink slightly. Cook for exactly 2.5 minutes on the first side without moving them, allowing a deep golden crust to form. Flip the chicken using Silicone-Tipped Tongs and cook for another 2.5 minutes on the other side. The chicken is done when it is golden and firm to the touch, or reaches an internal temperature of 153°F (67°C).
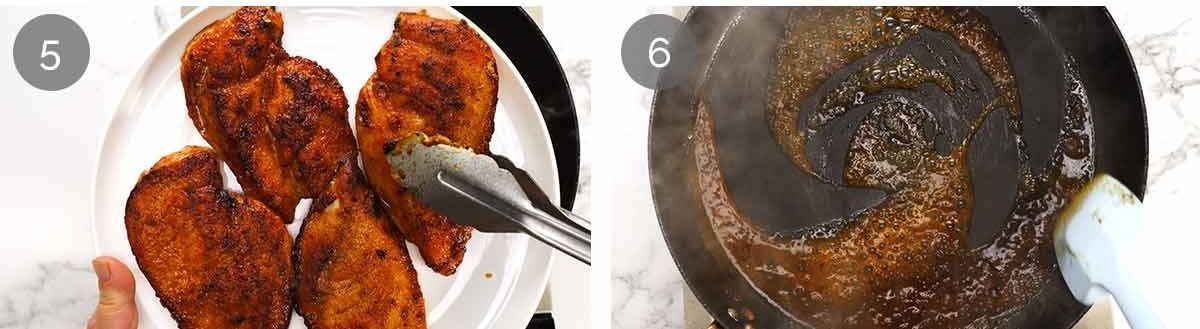
Rest and Deglaze
Remove the chicken from the pan onto a warm plate. Do not skip this step: Let the chicken rest for 3 minutes. While the chicken rests, reduce the heat to medium-high. Pour the white wine (or stock) into the hot pan. It will bubble aggressively. Simmer rapidly for about 1 to 1.5 minutes, scraping the bottom of the pan with a rubber spatula to dissolve the golden “fond” (flavor bits). Reduce the liquid by half. Turn off the heat, add the remaining butter, and stir vigorously until melted and creamy. Pour this luscious sauce over the rested chicken and garnish with parsley.
4. The Science of Juicy Chicken
At dishy.blog, we believe cooking is applied science. The success of this recipe relies on two scientific principles: protein denaturation and emulsification. Understanding these will help you master not just this dish, but all meat cookery.
Temperature Control & Carry-Over Cooking
Chicken breast has very little fat, meaning it dries out instantly if overcooked. While the FDA recommends 165°F (74°C), professional cooks know that pulling the meat at 153°F-155°F (67°C) is safe because of “carry-over cooking.” As the meat rests, the residual heat on the exterior travels to the center, raising the internal temperature by another 5-10 degrees while you make the sauce. This results in meat that is fully cooked but retains its moisture. We highly recommend checking this with a Digital Meat Thermometer for 100% accuracy.
The Pan Sauce Emulsion
The sauce is a simple “Beurre Monte.” By swirling cold butter into the reduced wine off the heat, the butter fats emulsify into the liquid rather than separating as oil. The tiny amount of flour left in the pan from the chicken searing acts as a stabilizer, ensuring the sauce is glossy and coats the back of a spoon, rather than being thin and watery.
Complete Your Meal
A great main dish deserves an equally impressive side. Our “Healthy Salads” collection offers crisp, vibrant vegetable pairings that cut through the richness of the butter sauce perfectly.
5. Expert Tips & Troubleshooting
Even with simple recipes, variables in your kitchen equipment can affect the outcome. Here are expert solutions to common issues to ensure your dinner is foolproof.
Common Questions
- Can I use chicken thighs? Yes! Boneless, skinless chicken thighs work beautifully with this seasoning. You will need to increase the cooking time by about 1-2 minutes per side as thigh meat is more forgiving and takes longer to cook through.
- What if I don’t drink alcohol? The wine adds acidity and complexity, but you can substitute it with low-sodium chicken broth. If using broth, add a squeeze of fresh lemon juice at the very end to mimic the acidity of the wine.
- Storage & Reheating: Leftovers can be stored in Airtight Glass Containers for up to 3 days. To reheat, avoid the microwave if possible, as it rubberizes the protein. Instead, gently warm the chicken in a pan with a splash of water or stock over low heat until just heated through.

Meet Jack Reynolds, the face, the stomach, and the passionate home cook behind dishy.blog. If you are looking for a Michelin-starred chef with decades of formal culinary training and a fancy restaurant background, you are definitely in the wrong place! Jack is not a professionally trained chef; he is just a regular guy who happens to have a massive, undeniable obsession with good, hearty food and feeding the people he loves.
Born and raised in the heart of Texas, Jack grew up watching his mother and grandmother turn basic pantry staples into absolute magic. However, as he grew older and started working a demanding 9-to-5 corporate job, he realized that most recipe blogs online were either incredibly complicated, required expensive and hard-to-find ingredients, or took hours to prepare. Frustrated by the lack of realistic weeknight meals for busy families, Jack decided to roll up his sleeves, tie on a flour-dusted apron, and start experimenting in his own kitchen.
He began modifying classic Southern comfort foods and traditional American dinner favorites to make them quick, easy, and incredibly pantry-friendly. What started as a small digital diary to keep track of his kitchen triumphs (and a few burnt failures) eventually blossomed into dishy.blog.
Jack’s culinary philosophy is incredibly simple: cooking at home should never be intimidating, complicated, or boring. He truly believes that the fondest memories are made when gathered around a table with a wildly delicious, home-cooked meal. Whether he is perfecting a 20-minute One-Pan Garlic Butter Steak, cracking the code to the crispiest buttermilk fried chicken, or baking a batch of his famous “melt-in-your-mouth” triple-fudge brownies, Jack’s mission is to provide foolproof recipes that anyone can master. Every single recipe on dishy.blog is rigorously tested and family-approved to guarantee flawless results.
When he isn’t busy creating mouth-watering dishes or tweaking his ultimate baked mac and cheese recipe, Jack loves hosting weekend backyard BBQs, exploring local Texas farmers’ markets, and spending time with his wife and two kids—who happily serve as his primary, and toughest, taste testers.