
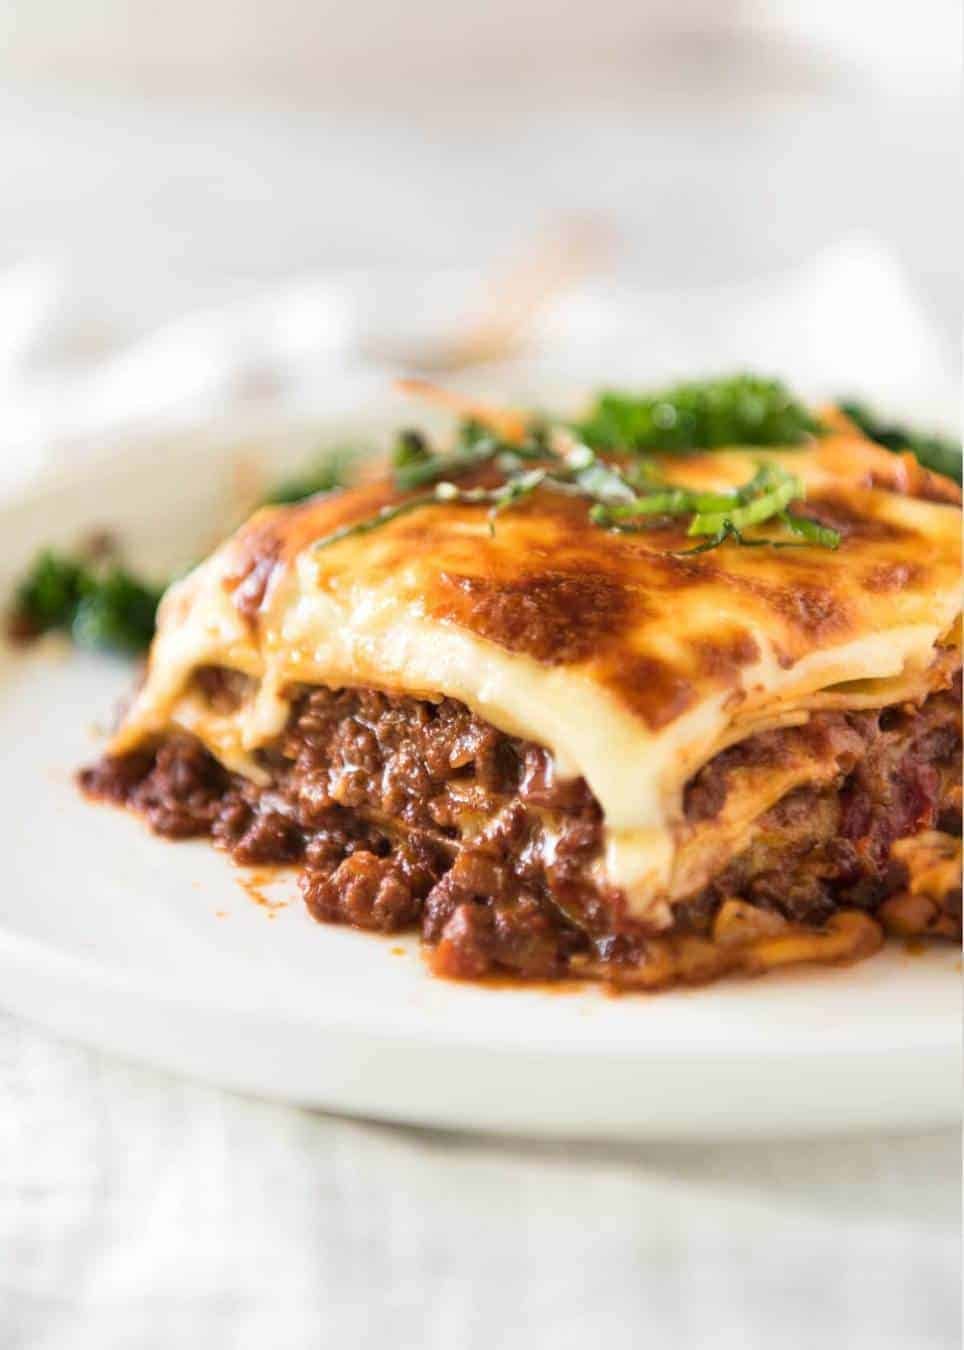
This classic homemade lasagna recipe is the ultimate labor of love, featuring layers of tender, slow-cooked Bolognese ragu and a velvety, rich Béchamel cheese sauce. At dishy.blog, we have meticulously tested this traditional Italian method to ensure that, while it requires patience, the result is a melt-in-your-mouth masterpiece that is infinitely superior to any quick-fix version. Get ready to create the most comforting meal your family has ever tasted.
🛠️ The Right Tools for a Heavy-Duty Meal
Enameled Cast Iron Dutch Oven
To develop deep flavors in the ragu, you need a heavy-bottomed pot that distributes heat evenly and holds a simmer for hours without burning.
Ceramic Lasagna Baker
Standard pans often overflow. This deep, high-resistance ceramic dish ensures your 4-layer lasagna cooks evenly and stays contained.
Jump to Section:
Love Hearty Family Meals?
Lasagna is just the beginning. If you crave more soul-warming dishes that bring everyone to the table, explore our collection of Classic American Comfort Food. From casseroles to pot roasts, these recipes are tested to perfection.
1. The Ragu Bolognese (The Foundation)
The heart of any exceptional lasagna is the meat sauce. Unlike a quick weeknight spaghetti sauce, this Ragu Bolognese is cooked slowly to break down the beef fibers until they are incredibly tender. We build layers of flavor starting with a soffritto (onion, carrot, celery) and deepen it with red wine and beef bouillon. This process cannot be rushed; the time you invest here directly translates to the richness of the final dish.
Ingredients
- • Olive oil: 1 tbsp
- • Onion: 1 large (finely chopped)
- • Carrot: 1 medium (peeled and very finely diced)
- • Celery stick: 1 (very finely diced)
- • Garlic: 2 cloves (minced)
- • Beef mince (Ground Beef): 1 kg / 2 lb
- • Canned crushed tomato: 800g / 28 oz
- • Tomato paste: 1/4 cup
- • Red wine: 1 cup (Pinot Noir or other dry red)
- • Beef bouillon cubes: 3 (crumbled)
- • Dried herbs: 1/2 tsp each of Thyme and Oregano
- • Bay leaves: 2 dried or fresh
- • Worcestershire Sauce: 2 tsp
- • Sugar: 1-2 tsp (optional, for balance)
- • Salt and Black Pepper: 1/2 tsp each
Instructions
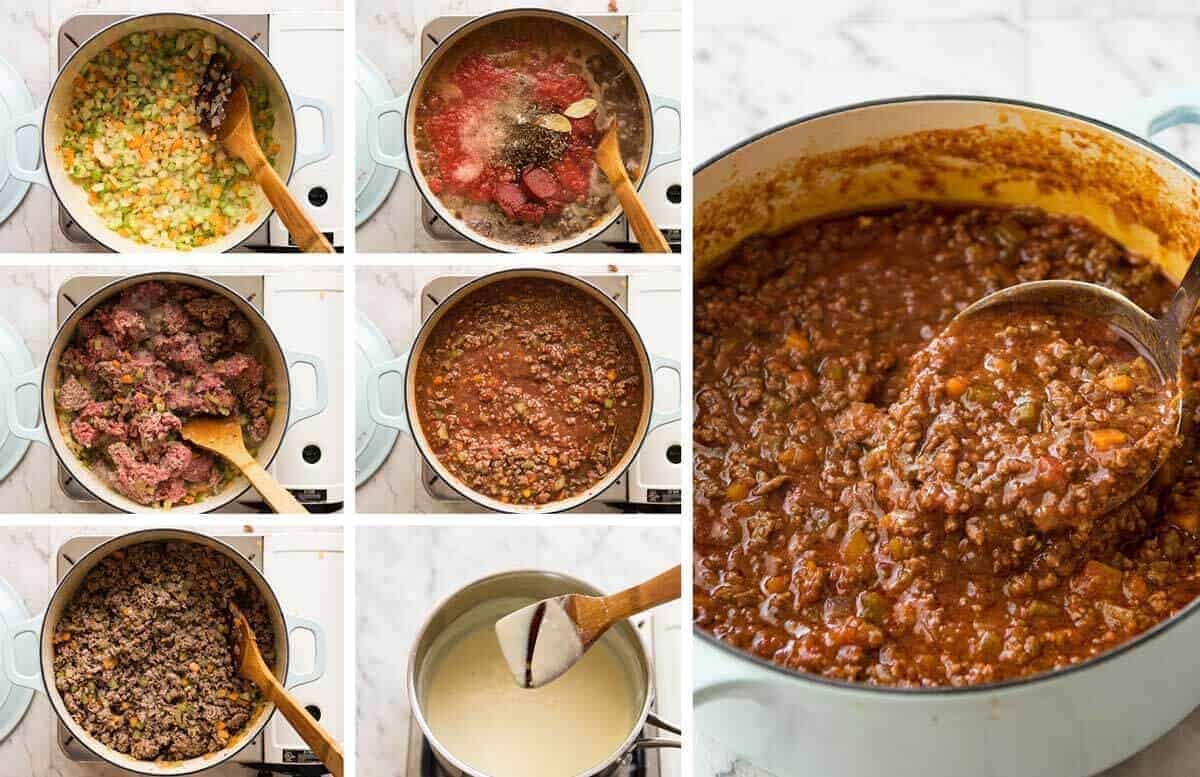
Sauté the Aromatics (Soffritto)
Heat the olive oil in a large, heavy-based pot (like a Dutch oven) over medium heat. Add the minced garlic, chopped onion, finely diced celery, and carrots. This mixture is known as a soffritto, the holy grail base for Italian sauces. Cook these gently for about 10 minutes. The goal is to soften them until they are sweet and translucent, not to brown or burn them. If they start catching color too quickly, turn the heat down immediately.
Brown the Beef
Increase the heat to high and add the 1kg (2 lb) of ground beef. Cook the beef vigorously, breaking it up constantly as it browns. You want to avoid large clumps of meat; the texture should be fine and uniform to layer well later. Continue cooking until all the pink is gone and the meat is fully browned.
Simmer to Concentrate Flavor
Once the beef is browned, add the crushed tomatoes, tomato paste, red wine, crumbled bouillon cubes, bay leaves, thyme, oregano, and Worcestershire sauce. Stir everything thoroughly to combine. Bring the mixture to a simmer, then reduce the heat to low so it is bubbling very gently. Cover the pot with a heavy lid and cook for 1.5 to 2 hours. Stir occasionally to prevent sticking. Finally, remove the lid and simmer for another 30 minutes to reduce excess liquid. The sauce is ready when the meat is melt-in-your-mouth tender and the consistency is rich and thick, not watery. Taste and adjust with salt, pepper, and the sugar if the tomatoes taste too acidic.
2. The Cheese Sauce (Besciamella)
While American versions often use ricotta, this traditional style utilizes a Béchamel (or Besciamella) sauce enriched with cheese. This white sauce binds the lasagna layers together, creating a creamy, cohesive bite that ricotta mixtures simply cannot match. It requires a bit of technique to ensure there are no lumps, but the silky result is worth the effort.
Ingredients
- • Butter: 60g / 4 tbsp
- • Flour: 1/2 cup (All-purpose)
- • Milk: 4 cups (Preferably full fat for creaminess, low fat works)
- • Cheese: 2 cups (Gruyere, Colby, Cheddar, or Monterey Jack), shredded yourself
- • Parmesan: 1/2 cup (optional addition for depth)
- • Nutmeg: A pinch (freshly ground is best)
- • Seasoning: Salt and pepper to taste
Instructions
Make the Roux
In a large saucepan, melt the butter over medium-low heat. Add the flour and cook, stirring constantly with a wooden spoon or whisk, for about 1 minute. This cooking process removes the raw flour taste but be careful not to let it brown too much; we want a blonde roux for a white sauce.
Incorporate the Milk
Pour in about 1 cup of the milk while whisking vigorously to incorporate it into the flour mixture. Once the mixture is mostly smooth and paste-like, gradually add the remaining milk. Using a high-quality whisk is crucial here to break up any stubborn lumps. If you heat the milk slightly in a separate pot or microwave before adding it, the sauce will thicken faster.
Thicken and Season
Turn the heat up to medium-high. Stir occasionally at first, then constantly as it heats up. Cook for 5-8 minutes until the sauce thickens enough to coat the back of a wooden spoon. It should be the consistency of heavy cream. Remove from heat immediately. Stir in the shredded cheese, a pinch of nutmeg, salt, and pepper. Stir until the cheese is completely melted and the sauce is glossy. Fresh nutmeg makes a world of difference; use a Microplane Zester to grate it directly into the pot for an aromatic kick that defines authentic Béchamel.
Need Dinner on the Table Faster?
We know you don’t always have 4 hours to spare for lasagna. For busy weeknights, check out our “30-Minute Meals” collection. These recipes deliver big flavor without the long wait, perfect for keeping your family fed and happy on a tight schedule.
3. Assembly & Baking
Now comes the rewarding part: building the masterpiece. This recipe is designed for 4 layers of pasta, ensuring a substantial, tall lasagna that stands up on the plate. Proper layering is key to ensuring the pasta cooks evenly and the structural integrity of the slice is maintained.
Assembly Components
- • Fresh Lasagna Sheets: 350g / 12 oz (or 250g dried)
- • Mozzarella Cheese: 1.5 cups (shredded, for topping)
- • Fresh Basil or Parsley: For garnish
- • Prepared Ragu Sauce
- • Prepared Cheese Sauce
Instructions
Preparation
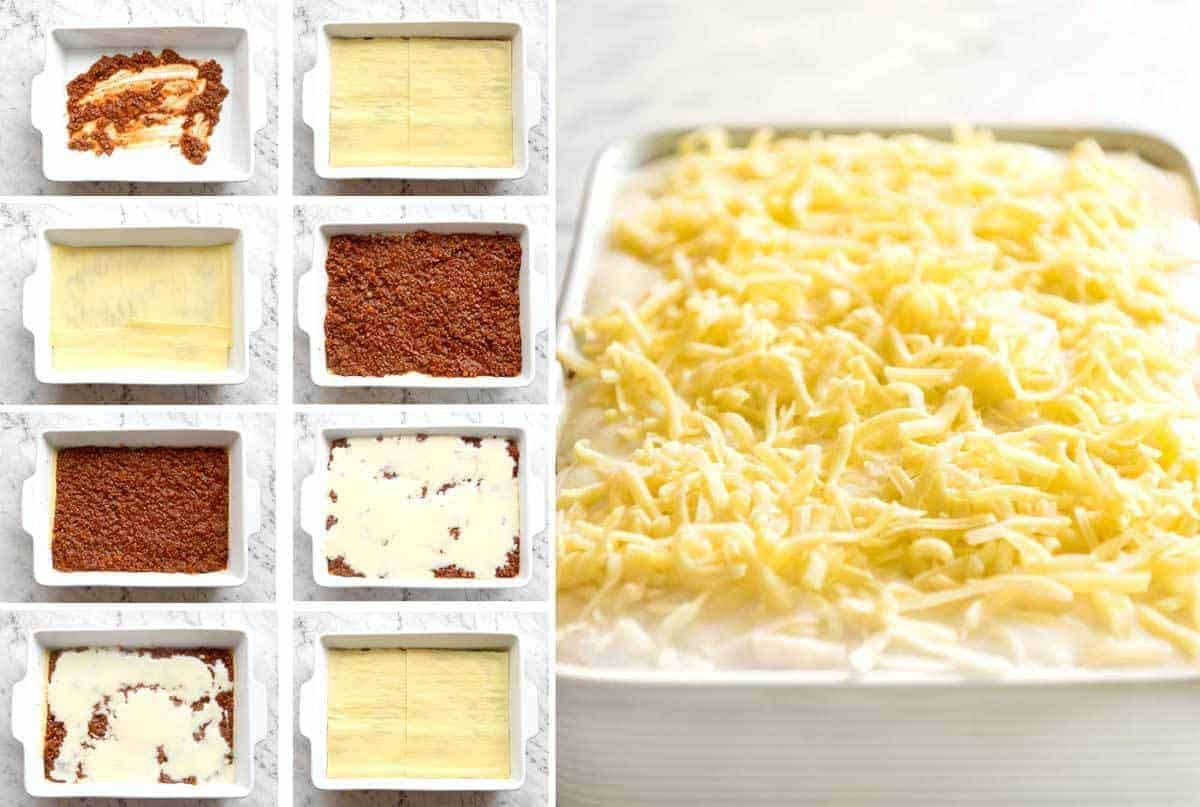
Preheat your oven to 180°C / 350°F. Have your baking dish ready; a 33 x 22 x 7 cm (13 x 9 x 2.5 inch) dish is ideal. Smear a small amount of the Ragu on the very bottom of the dish. This prevents the bottom layer of pasta from sticking to the dish or sliding around while you are trying to serve it.
The Layering Strategy
Base Layer: Cover the sauce-smeared base with lasagna sheets. You may need to tear sheets to fit them perfectly. Spread over about 2 1/2 cups of Ragu (enough to cover the sheets entirely), then drizzle over 1 cup of Cheese Sauce. Use an Offset Spatula to spread the sauces evenly to the corners; this tool gives you much better control than a spoon.
Middle Layers: Top with another layer of lasagna sheets. Repeat the spreading process: 2 1/2 cups Ragu, followed by 1 cup Cheese Sauce. Repeat this one more time (creating 3 full layers of meat/sauce).
Top Layer: Place the final 4th layer of lasagna sheets on top. Pour over the remaining Cheese Sauce (you usually don’t put meat on the very top layer in this style). Spread it to the edges.
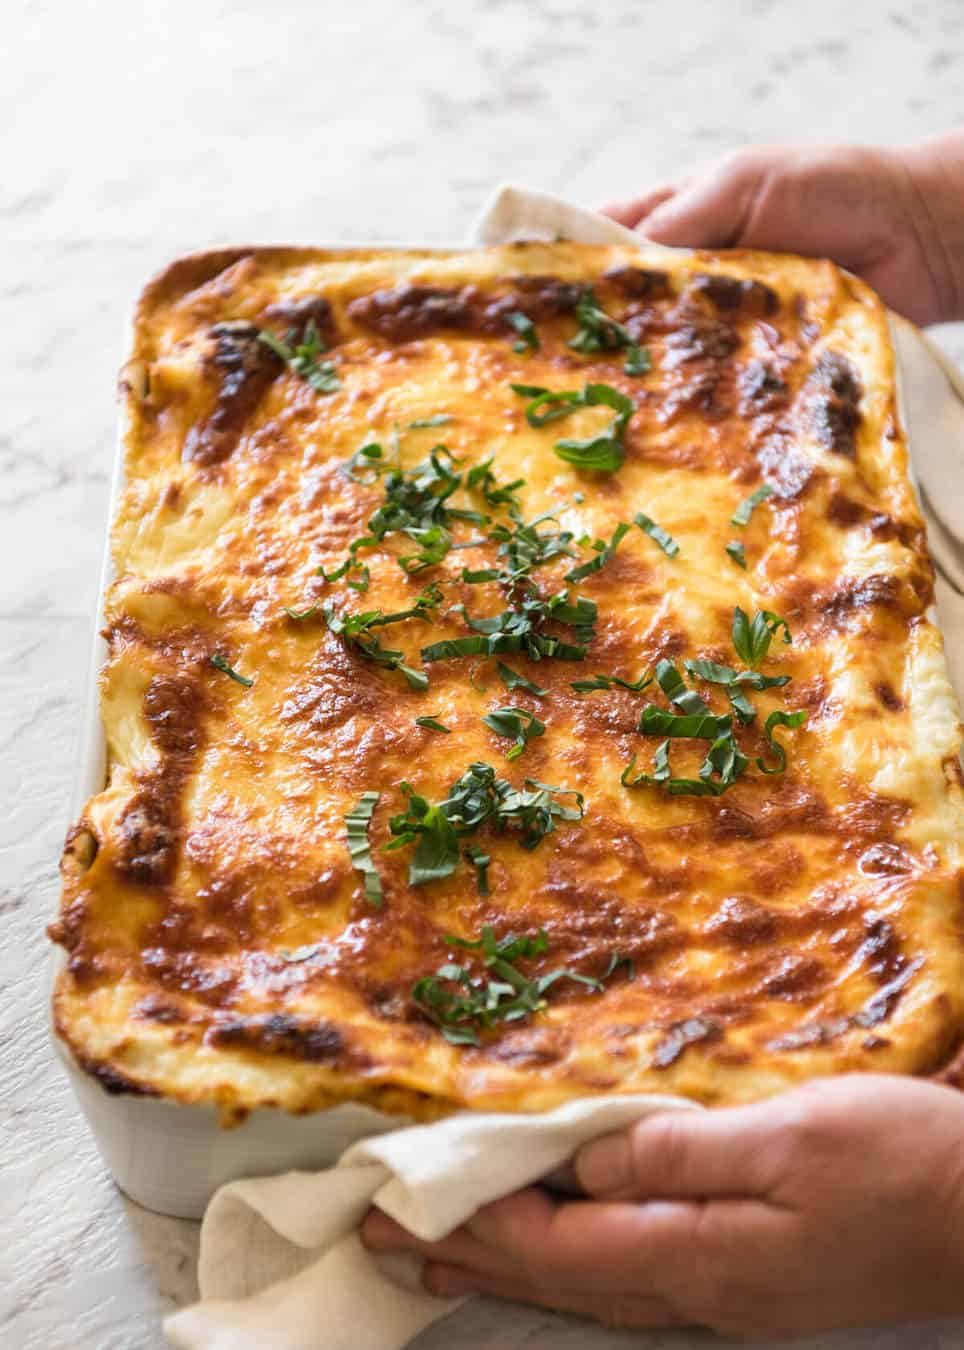
Bake and Rest
Sprinkle the 1.5 cups of shredded Mozzarella over the top. Bake for 25 minutes or until the cheese is golden brown and bubbling vigorously. If using dried pasta sheets, you might need to bake slightly longer (check package instructions). Once done, remove from the oven and let it stand for 5 to 10 minutes. This resting period is critical; if you cut it immediately, the layers will slide apart. Resting allows the sauces to set slightly, giving you those perfect, clean-cut squares.
🧪 The Science of a Perfect Slice
Why choose Béchamel over Ricotta? At dishy.blog, we prioritize texture. Ricotta cheese can often become grainy or release excess water during baking, leading to a “puddle” at the bottom of your dish. A Béchamel sauce relies on the gelatinization of starches (from the flour in the roux) which traps the liquid (milk). This creates a stable, cohesive emulsion that melts with the pasta rather than sitting separate from it. Furthermore, the acidity in the tomato-based Ragu is perfectly neutralized by the creamy, alkaline nature of the milk-based white sauce, creating a balanced flavor profile that isn’t too sharp or too heavy.
📝 Essential Chef’s Tips & FAQ
Fresh vs. Dried Pasta Sheets
We highly recommend using fresh lasagna sheets found in the refrigerated section. They have a superior texture and absorb sauce better, melding with the filling. If you must use dried sheets, look for “no-boil” or “instant” varieties. However, be aware that dried sheets absorb significantly more liquid. If using dried, ensure your Ragu is slightly saucier or add a splash of water to the sauce layers to ensure the pasta hydrates fully without drying out the lasagna.
Storage & Freezing (Pantry Friendly)
- Reheating: To reheat, cover the slice with Heavy Duty Aluminum Foil to prevent the cheese from burning and bake at 350°F until heated through. Alternatively, the microwave works great for single portions—it keeps the pasta moist.
- Make Ahead: You can assemble the entire lasagna up to 24 hours in advance and keep it in the fridge before baking. If baking from cold, add an extra 10-15 minutes to the cooking time.

Meet Jack Reynolds, the face, the stomach, and the passionate home cook behind dishy.blog. If you are looking for a Michelin-starred chef with decades of formal culinary training and a fancy restaurant background, you are definitely in the wrong place! Jack is not a professionally trained chef; he is just a regular guy who happens to have a massive, undeniable obsession with good, hearty food and feeding the people he loves.
Born and raised in the heart of Texas, Jack grew up watching his mother and grandmother turn basic pantry staples into absolute magic. However, as he grew older and started working a demanding 9-to-5 corporate job, he realized that most recipe blogs online were either incredibly complicated, required expensive and hard-to-find ingredients, or took hours to prepare. Frustrated by the lack of realistic weeknight meals for busy families, Jack decided to roll up his sleeves, tie on a flour-dusted apron, and start experimenting in his own kitchen.
He began modifying classic Southern comfort foods and traditional American dinner favorites to make them quick, easy, and incredibly pantry-friendly. What started as a small digital diary to keep track of his kitchen triumphs (and a few burnt failures) eventually blossomed into dishy.blog.
Jack’s culinary philosophy is incredibly simple: cooking at home should never be intimidating, complicated, or boring. He truly believes that the fondest memories are made when gathered around a table with a wildly delicious, home-cooked meal. Whether he is perfecting a 20-minute One-Pan Garlic Butter Steak, cracking the code to the crispiest buttermilk fried chicken, or baking a batch of his famous “melt-in-your-mouth” triple-fudge brownies, Jack’s mission is to provide foolproof recipes that anyone can master. Every single recipe on dishy.blog is rigorously tested and family-approved to guarantee flawless results.
When he isn’t busy creating mouth-watering dishes or tweaking his ultimate baked mac and cheese recipe, Jack loves hosting weekend backyard BBQs, exploring local Texas farmers’ markets, and spending time with his wife and two kids—who happily serve as his primary, and toughest, taste testers.